So in order to make these bracelets, a lot has to be done. You might be thinking well man, you just took the lenses and put em on a bracelet- that I did! But man, if that was all there was to it, I would be dishing these things out left and right. It is a long process, and this is the short version. Let me walk you through it the best I can.
First, figure out what kind of Lens Bracelet® we want to make!
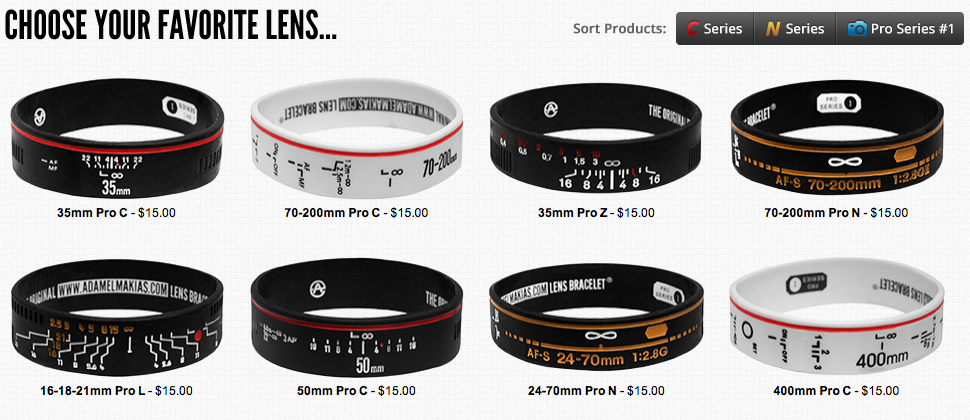
I knew I wanted to make more bracelets, and not just more lenses, but step it up in some way, some how. I eventually came to the conclusion that I wanted more information on the face the bracelets. I took into consideration that our Pro Lens Bracelet was our bestseller, and people almost always purchased at least one of them. In addition, I wanted to try and create the look I had originally intended the Lens Bracelet to be. First time around however I couldn’t get that red stripe on there. There are tons of rules with each silicone bracelet. One of them is that the ink can’t be with in 2mm of the edge of the bracelet. So on my original sized bracelets I couldn’t fit any red stripe AND other info. The first time I made the bracelets I went through hell trying to add a red stripe after the fact, I tried paints, adhesives, other materials, did some research, called some stores- long story short nothing can be applied to silicone after it is made… well silicone that moves that is. After you make it, that is how it will be for the rest of its little puny silicone life.
Anyway, Pro bracelet most popular, trying to add more to bracelet and the last step was to see which lenses people wanted the most. I did a few quick polls on the Lens Bracelet® fan page, researched popular lenses on www.dpchallenge.com, asked around to some of my photography friends, and narrowed it down to about 25 lenses.


Awesome, now to design these bad boys. This is where stuff starts to get a little fun. Field trip time! For the first two Lens Bracelet® Series I just used some google images, cut some stuff out, took some photos of my own lenses, and copy and pasted a lot of numbers and letters. It worked great, very time consuming but there wasn’t too much happening on the older series. This time around though, we were going to fuck shit up. But yea, field trip!
I had been talking to Michael Cardwell over at Lens Rentals and he introduced me to his boss Drew. I asked them if I could fly out and photograph a bunch of lenses so I could make bracelets out of them. They said sure… I was stoked. The hardest part about making these things before was getting the designs right, now I would have 1000’s (not an exaggeration) of lenses at my fingertips. I snuck a flight to Memphis, TN between a tour that ended in NYC and another that started in Wisconsin. The first night we got some drinks together, maybe a few too many drinks. We went to a Cayote Ugly kinda bar, you know where the girls dance on the tables and crap? Only we were like the only people in this massive bar with one girl dancing. It was pretty funny.


I showed up and they gave me a tour of the place. One of the coolest places EVER. As a photographer I about got down on my knees and shed some tears. They have 1000’s of perfect condition lenses. They clean ’em when they get shipped out, clean ’em when they get shipped back, and sell anything that has been used for about a year or so. Amazing little operation they have going on. Anyway, I filed out a list of lenses I wanted to shoot and gave it to one of the lovely ladies working the stock. She basically went around grabbing glass off the shelves and putting it into a bucket. I took the bucket back to a small studio they had set up and started shooting away. I shot about 30 lenses in total. Please excuse the shit filters I put on these in instagram, I had just downloaded it and was getting a little artsy.


Each lens required about 10 shots, I had to spin the bad boy and take pictures of it from every angle.

After getting all my images I went home and downloaded everything on to my computer, and slowly put each lens back together. It took for frickin’ ever! But when it was all said and done I had about 25 lenses laid out like a bear skins. I hope that analogy makes sense. Here is a visual of one.

I went through each one and choose my most favorite parts of the lens, and collapsed it down into a predetermined height. The width didn’t matter so much because it just gets filled with grip texture. I varied the grip texture as well depending on which lens was being modeled. Some have two rows of grip, others one, others two different sizes etc etc.Next step was to turn it more into a graphic than an image. This involves blackening the blacks and whitening the whites and cleaning up all the edges. I can’t really post these images because… well these things are already easy enough to rip off- don’t want to just start handing out some designs!
After everything was set I sent the designs to the factory and it was time to start working on the kinks… and man were there a lot of kinks
First I ordered two bracelets to start testing everything, the width, durability, weight etc. After ordering they told me my lines had to be farther from the edge and that they weren’t going to deboss the printing because it was too intricate. This worried me because the debossing helps make sure that none of the paints run off. I brought this up with the factory and they told me that in the past the ink only rubbed off because the oils were wrong… sketch! Haha. This time it would be okay. I was skeptical but I trusted them.. bad choice. Me and a few of my friends test wore the bracelets for two weeks. One wrist stayed on 24/7 and the other was removed when taking showers. The shower one faded quicker than the other, but ultimately they both faded.
Next step, get them debossed. I emailed the factory the above image and told them we had to find a way to deboss these. They said the lines had to be thicker. I asked how thick, and they responded with about two millimeters. So I redid all the designs and made them a tad bit thicker. Sent them off to her and got the okay! Awesome, deobssed silicone here we come. Now It was time to send in all 10 designs, not just the two.
It works like this… I send them my designs, they send em to their “technicians” and they re-make the designs. I then receive a sheet with everything laid out on it nice so I can approve each design one by one. . this is where all the accidents happen. They usually make a few changes that I don’t notice, even after looking everything over 10 times- I missed a few. So I okayed the designs, got them shipped, found kinks, had them all reprinted.
A few things that were changed that I missed-
- a 0 was colored in the wrong color
- a ” .” was colored in incorrectly.
- a line was colored red instead of white
- a number was missing from a series or numbers
It’s crazy, I am making a silicone bracelet- which is relatively easy. Well compared to other silicone bracelets this is complicated, but I can’t even fathom how hard it would be to create something like a chair, a computer, or a car. Much respect to those companies!
It’s okay, these mistakes were all fixable. One time I ordered over 2,000 bracelets with my name spelled incorrectly on the interior. Ladies and gentlemen, I do own www.adamelmamkias.com for this reason. I fudged up haha.
Alright we worked out the kinks and got our final orders in a little over a month later.

Next, my least favorite part- the product shots. I love taking images, I do it for a living most of the time. But products shots, man are they tedius.
Step One: Select bracelets and wash them off, then dry them out in clean air. No dust!

I have learned over the times that even little pieces of dust or hairs really mess up the images. Sure I can photoshop them out but it is very time consuming in the worst way possible. So washing it is!
Step Two: Lotion ’em up baby!
Step Two: Lotion ’em up baby!
The Lens Bracelets look their best after they have been worn for about a month, and then from then on in they just start looking better and better. Its like leather, the more you wear it the shinier and glossier it gets. I think thats how leather works? Either way… thats how our silicone bracelets look. So to help mimic this clean look I lotion up each bracelet. Not too much though! Or it fill sin the cracks with white and looks terrible.
Step Three: photograph them

The hard part about this is making sure everything looks almost identical. I failed the first two times I took these shots, all the bracelets looked like they shriveled up and died. Last time around I photos hoped the designs onto a template I had designed, but I wanted more real images this time. So I made a circle out of needles and put the bracelets around the needles, this keeps them all in the exact same position. In addition I made sure my camera set up was the same in each shot, and my lighting as well.
Step Four: Edit the images


This isn’t any fun either haha, it involves skin like spot editing on 25+ images of black silicone bracelets.
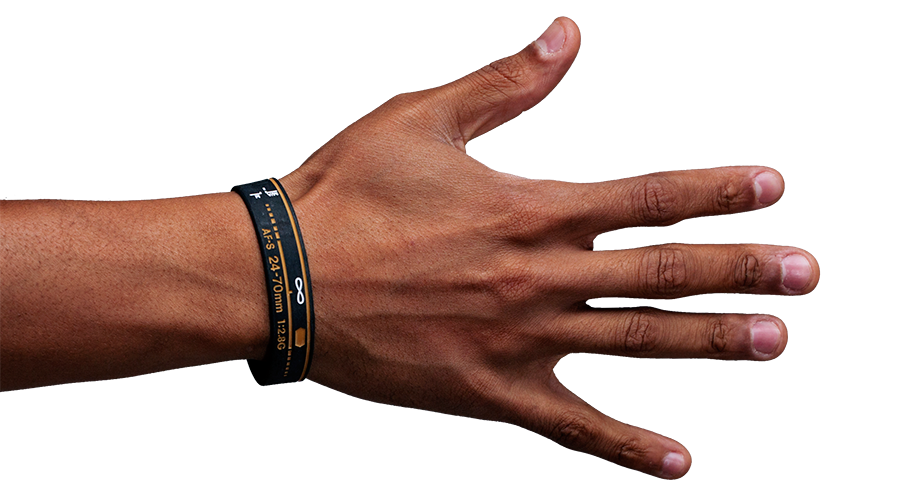
Step Five: Bracelet on hand images

Repeat above, but put the bracelets on a few peoples hands, no needles cause that would mean blood, and blood doesn’t sell… bracelets.
Step Six: resize everything and prepare for web. I don’t have a picture for this, cause that would just be boring.
Packaging these things has been a learning process. It started with regular white envelopes. You have to realize I was sorta caught off guard at first when these did well. Were talking going from doing 2-3 orders a day, to doing well over 100-200 a week. So I just kept sending stuff out in white envelopes. The problem is bracelets go through machines and the envelopes break. It was no good. The first time I brought all my 100 envelopes into the post office they about killed me. First I brought them in and didn’t have any customs forms- turns out I needed one for each one because they were thicker than 1/2 an inch. So I went home and made up over 100 customs forms. Not fun at all. It took me about four hours. I printed everything because my handwriting is so terrible. Took them back and turned in a stack of customs froms and envelopes *current self smacks forehead*. Back then I didn’t know the customs forms had to be attached to each envelopes. So i went into the USPS store lobby and dumped out my trash bag of envelopes all over there floor and sorted through them like there was no tomorrow, this took an hour. Anyway, as you can see this thick envelope thing wasn’t working. Luckily one of my customers sent me an e-mail that save my life.
It’s killing me that I can’t dig this up! But he basically said “Hey Adam, I have a super secret way for you to pack your bracelets, but you have to send me one of each bracelet for free”. I wanted to know, but I hate being convinced to do something like this… I got over myself and sent him some free stuff. He told me to use two small rubbered bands on each side of the bracelet, this will flatten it out. Genius! A few bracelets was a small price to pay for this knowledge, no more customs forms! From there I started doing that and attaching them to my business card so that they wouldn’t flop around in envelope. We only ran into problems once in awhile with this set up, it worked for the most part! With this most recent release however we step our game up a bunch. These things will never break! Envelopes are from Envelopes.com, paper is from Kelly Paper in San Diego, business cards from overnightprints.com, rubber bands are from the beauty store that probably thinks we are creeps for just buying rubber bands, and the labels and seal we print on our own.


Lastly I wrote this blog, the other one, put some finishing touches on my site with the help of my good man Brandon Jacoby and then we launched. So exciting, so much work went into these silicone bands. I hope everyone enjoys them. *exhale*
If you want a Lens Bracelet, you can get one on www.lensbracelet.com

Now to finish this DVD!
ae