Remote shooting. I now rely on it. In addition to this blog I also made a nice YouTube video. So if you are a book person- read the blog. If you are a movie person- watch the video. Same content
I have been shooting with remote cameras for a while, but this has just meant putting a camera in front of the house (FOH) and triggering it to get some nice stage shots. Without this remote camera, I would have to sit upfront for a few songs with my camera in a boring static position and fire the shutter while I dreamt about all the shots I was missing upfront. Not fun. I want fun. It was a great solution, but I wanted to take it further! Now, it has become a standard part of my live shots.
All Time Low was going on their biggest headlining tour of their lives – and I was hired to cover it. In total it would be for five days. Five days in the UK, not that many – so I had to get this right. In the USA some tours are 35 dates. You can see all of my photos from this tour on THIS BLOG. The venues were so massive that I could not possibly reach the corners and balconies of the venue in a timely manner during the set. I mean, I could- but it would mean I would spend most of my time in transit or camping at a location waiting for a shot – rather than being active and looking for the shot. So it was crucial that I started to trigger my cameras, or I simply wouldn’t be able to get my job done. No job done = no job at all. No job at all = no food. No food = no happiness. No happiness – I die. I am not ready to die, yet.
Problem: large venues with lots of people (and only one me)
Solution: multiple cameras that passively shoot
As with any new skill, you have to practice. I knew this tour was coming up so I took some time on a smaller USA tour with Pierce The Veil to practice. I try to learn my new skills in comfortable settings. This way I am not learning too much at once and falling short of getting my job done. I needed to get to know my gear, and how it fails so that I could find solutions that made sense. I had one remote camera every day, and I would regularly change its position. It started with above the drummer, then did some FOH, put it in some other spots that didn’t work so well, but at least I learned what didn’t work. I thought I figured out most of the kinks… and I did figure out some of them. Such as focus issues, battery death, foggy lens, memory card full, and things like that. But the rest I just didn’t even know was a thing yet- a whole new batch of problems arose when I started the All Time Low tour. I guess I’ll start by telling you my process for shooting with remote cameras, and we will get to the new issues a little bit later.
Keep in mind that I do have permission to do all this. If you try to do this at a venue or for a band you are just credentialed to shoot the first three for, you might return to one of your remote locations with a broken camera or something of the sort and that would not be fun. Make sure you have permission! And if you don’t have permission, be super extra sneaky and don’t tell anyone I told you to do it.
Step 1: Scout the venue
First I had to figure out where to place my cameras. At some venues, it made sense to put it FOH, at others to hang them from the lighting truss, and sometimes I would mount one behind the drummer. A plethora of variables determined which route I would take but to keep it simple I just took sample shots at each location and figured out which one looked cool. You can tell if something looks cool by looking at it and going “Would a random stranger think this is awesome knowing nothing about who or what I was shooting?” Some venues offer certain looks that others don’t. For example, the SSE Hydro in Glasgow is very round and has a very high ceiling so it looks beautiful when you can shoot from the back of the venue or up above with a fisheye that accents its already spherical shape. On the other hand, Wembley Arena in London is quite long and looks better if you shoot from above with portrait rather than landscape so you can accurately show the number of people filling the seats at a concert. The hardest part was when I had to put my camera in a location that would then… move. Such as a lighting truss. Once the camera gets raised up, I don’t see it again until about 2:00 am. I could only adjust it via WiFi, but as far as the camera position- it had to stay the same.
Step 2: Set Up Cameras
I have come up with all different concepts and combinations using the gear I use, here are some visual representations of them. Honestly, whatever works for you to get the image is what works best. The main things to remember are a lot of changes during the show- so make sure you aren’t in the way of anything. And a lot more people enter after the doors open! So make sure they can’t steal your camera. I locked a few up and put a tour pass on it and told the nearby security guards a few times, still risky- but I gotta get my shots!
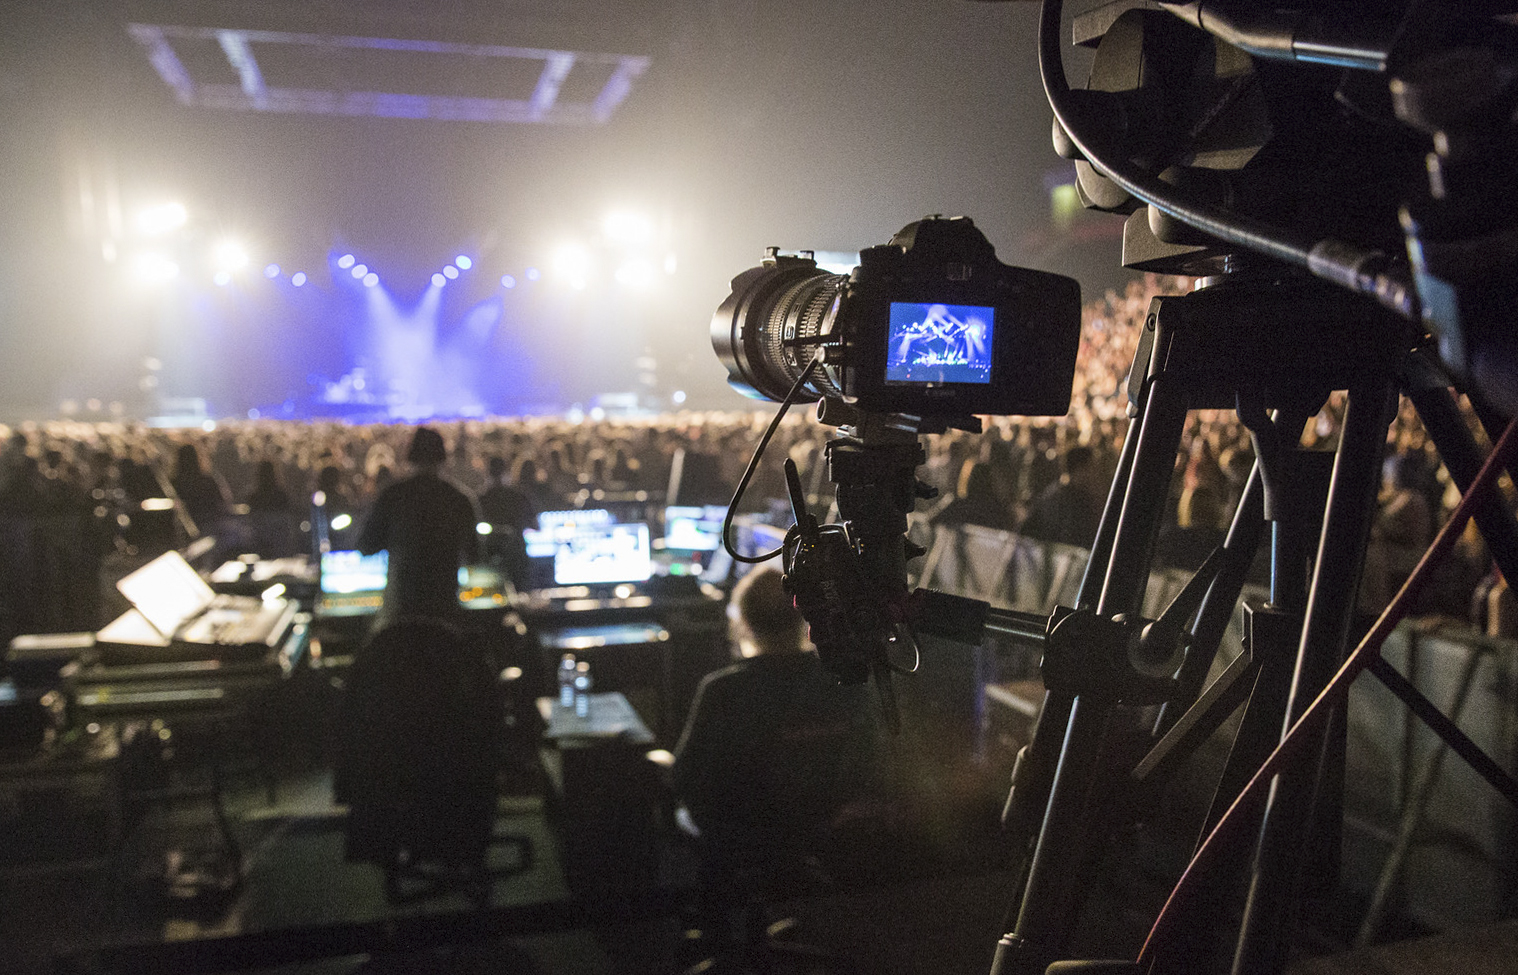
Front Of House Remote Cameras
This camera is set at Front of House. Probably my most sketchy setup to be honest, because each of those arms is holding well over their weight and straight up in the air. But somehow, it worked. No complaints! I will find a more viable solution for my next go. But if it works, it works. The area was pretty secure as you can see in the other images after. This took… 800 images? You can see a time-lapse of all the photos in my video at 3:55.
Gear Used In FOH Remote Cameras
- Canon 6D
- Canon 70-200mm f/2.8
- Manfrotto Superclamp
- Manfrotto Heavy-Duty Flex Arm
- Manfrotto Umbrella Swivel
- Manfrotto Swivel Tilt Head with Quick Release
- Pocketwizard Plus II


Drummer Remote Cameras
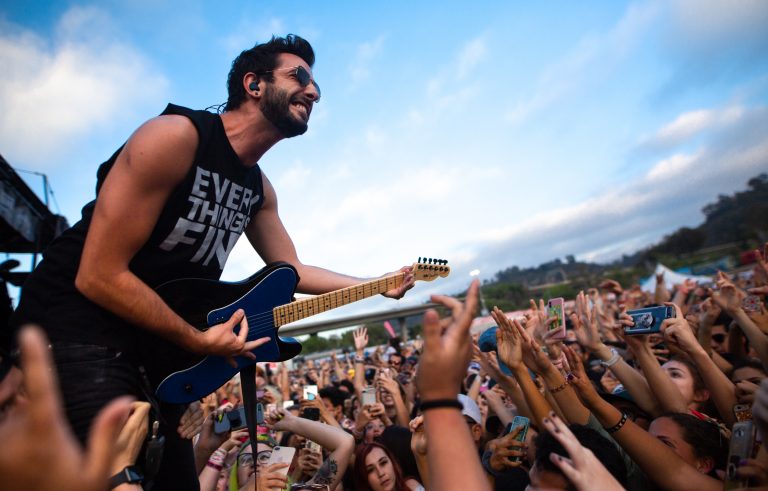
I could theoretically get this shot during the set… but I wanted the perfect shots- when the fire went off, or when everyone on stage would randomly all be up by the drummer. I’d 100% be back there camping out waiting for it. But a camera can. And I needed to get some shots from other locations so I had to get this camera up. In addition, this venue is pretty ugly so I was going to be focusing on the stage more, not so much the crowd. In most situations, I needed to keep my fisheye on me, but on days like this, I wouldn’t be using it to capture the venue from any other angle. Good venue, it’s basically just a big room, however- so nothing beautiful to capture from the crowd.
Gear Used In Drummer Remote Cameras
- Canon 6D
- Sigma Fisheye f/2.8
- Monopod
- Pocketwizard Plus II


I ended up having to move this camera down a bit lower so it was hidden behind the drummer’s head. They didn’t want it sticking out for the whole show. I think Rian (their drummer) would look nice with an antenna but I get paid to capture what is already happening… not create it.
Spotlight Catwalk Remote Cameras
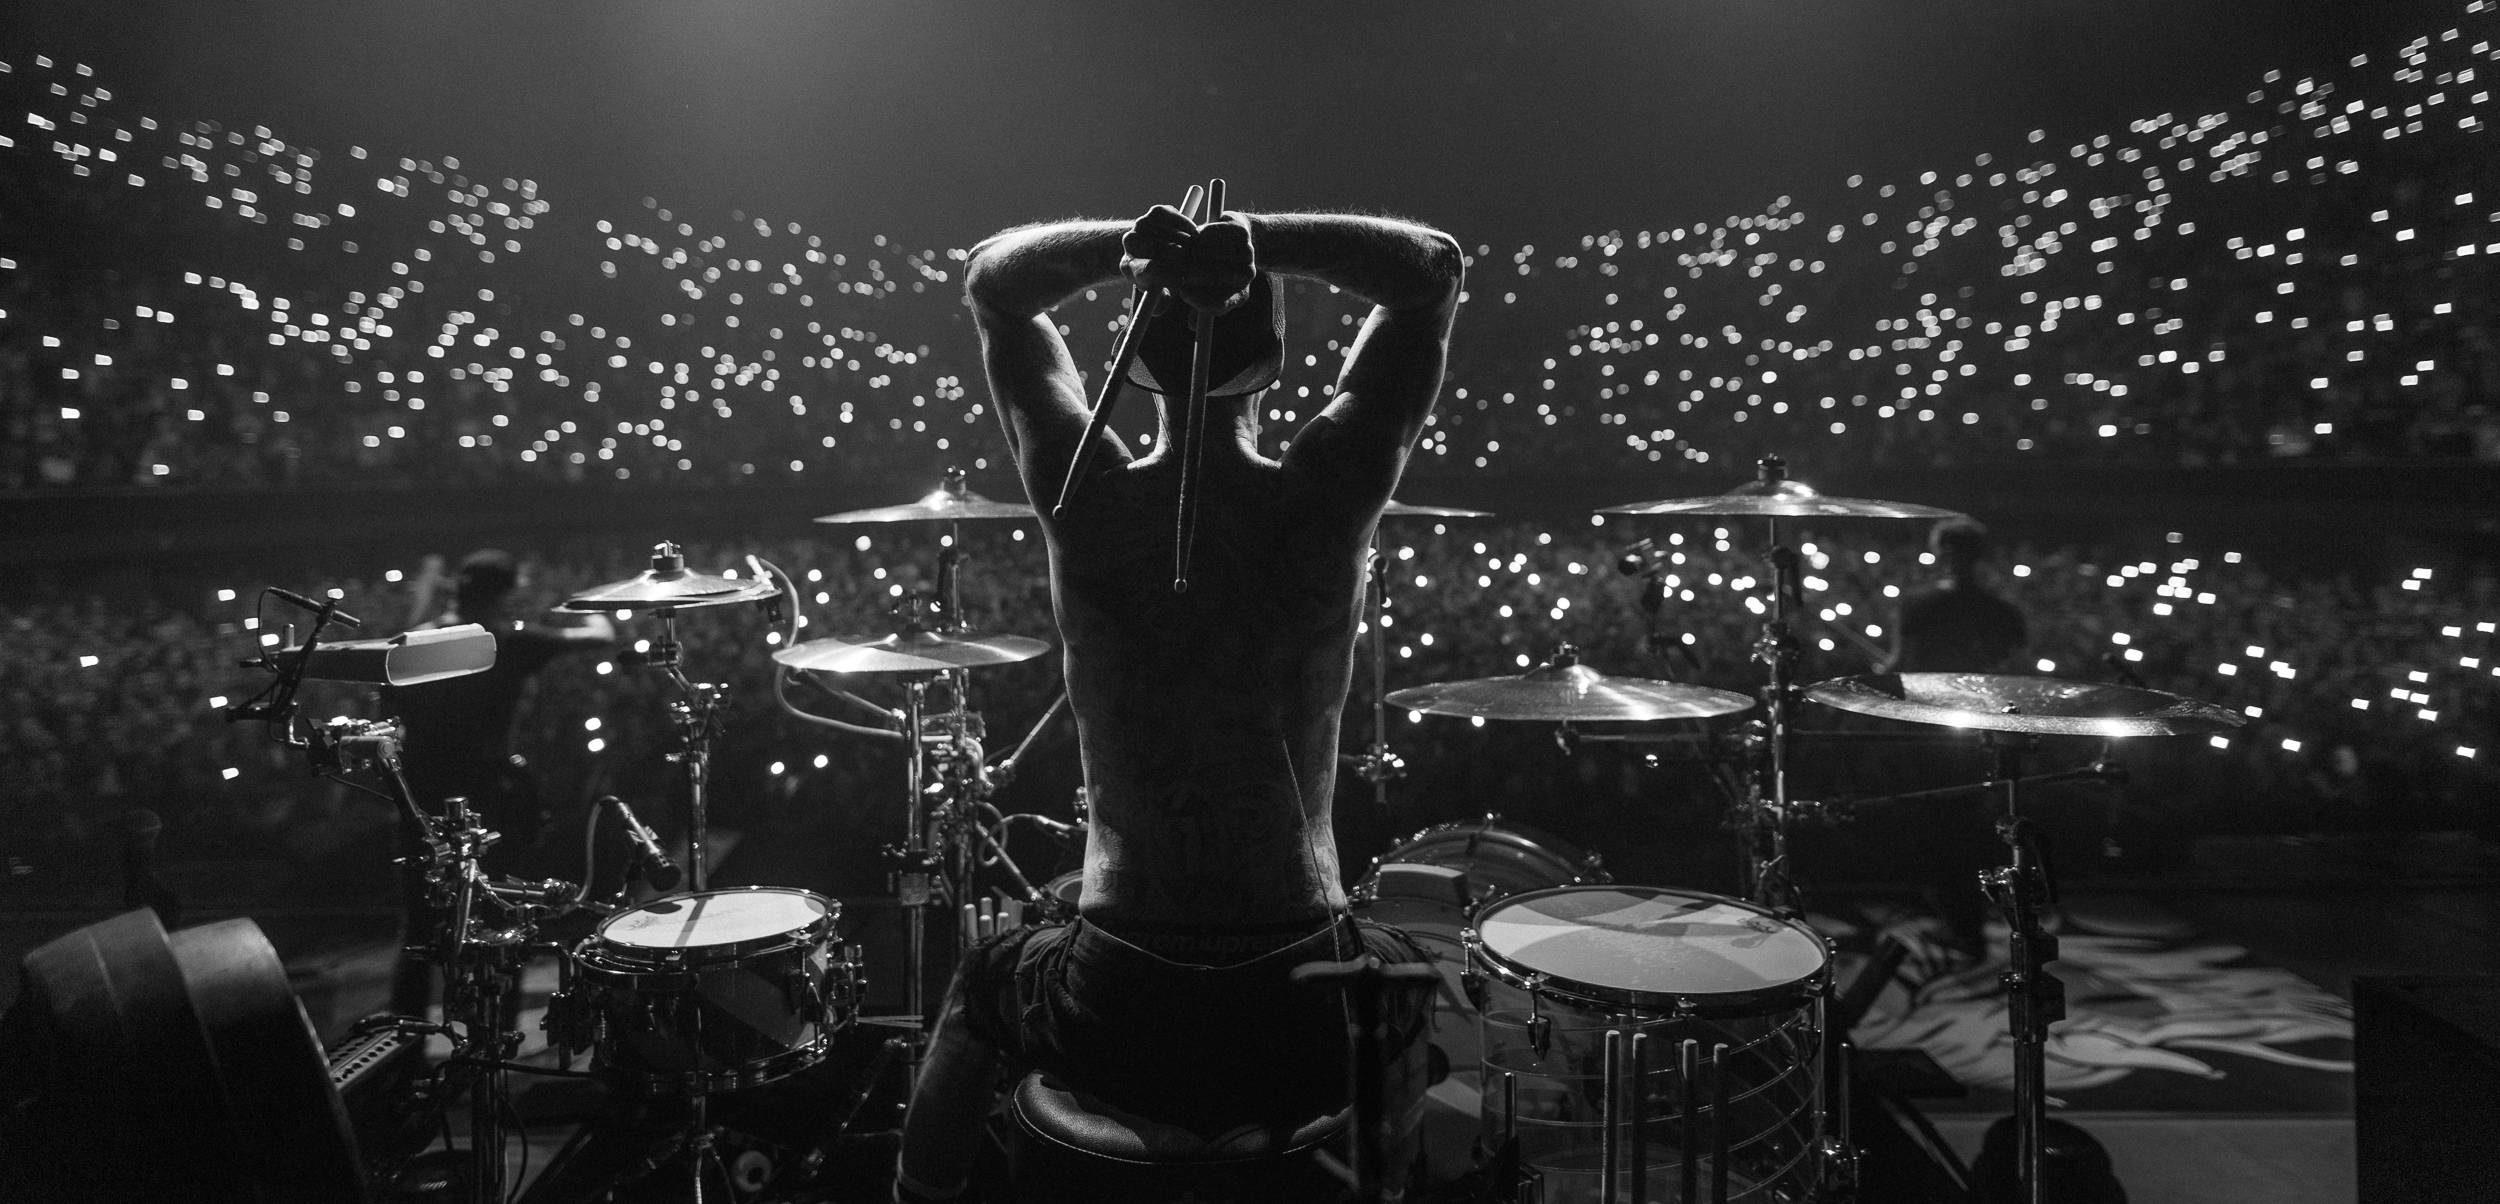
What an awesome location? Not usually attainable. But today was a special day I took advantage of it. I asked a guy working at the venue if I could go up… and to my surprise, he said yes. Every other day I was promptly turned down. Maybe he liked my smile or my wonderful haircut. To get to this location would have taken… 10 minutes. Then to get the shot would probably take another 10, and by the time I get back down I have missed a good 1/4th of their set and that just isn’t all that fun now is it?
Gear used in Spotlight Catwalk Cameras
- Canon 6D
- Canon 70-200mm f/2.8
- Manfrotto Superclamp
- Manfrotto Umbrella Swivel
- Manfrotto Swivel Tilt Head with Quick Release
- Pocketwizard Plus II

That being said I did end up going to the top that day, but about 50 feet forward an over the crowd- cause how often do you get to do that? It was pretty cool! I had to.

Lighting Truss Remote Cameras
Gear used in Lighting Truss Cameras
- Canon 6D
- Canon 70-200mm f/2.8
- Manfrotto Superclamp
- Manfrotto Umbrella Swivel
- Manfrotto Swivel Tilt Head with Quick Release
- Pocketwizard Plus II
This was the most complicated but also the most rewarding. I clamped my camera to the lighting trusses- these trusses hold hundreds of thousands of dollars in lights every show, and in the morning- they start at stage level. Then they raise them a few feet and attach all the lights. Then they fly them above the stage about an hour later. So every morning I would get up early, and bring my breakfast to the stage, watch them set up, and wait for my moment. It’s kind of complicated and tedious because there are a lot of people working, and a lot of people to piss off. I didn’t want to get in anyone’s way, and I didn’t want to get hurt, but I wanted to get my photos! This is what it looked like.

All of these were triggered by Pocketwizards. I would put one on my Canon 5D Mark III hotshoe, and every time I take a picture- my remote cameras would fire. Three photos would be taken in total every time I would smack that shutter. However, to fine-tune these cameras after they were hoisted up into impossible to reach areas was a whole other battle. I would use the WiFi setting Canon has conveniently implemented on their 6D’s. It’s a tad faulty, to be honest, but then again I am working in a venue that has smoke, fog, and a bunch of other things that could mess it up, I think? If only concerts were in grassy fields and nobody showed up. Then maybe it would work perfectly. But that wasn’t the case, and if it were my job would cease to exist.
This is how I adjusted my camera, through WiFi. I took this photo of me looking at my camera before it was raised up.

I would set at a nickname for the camera and raise it up. One was named “Ca” and the other “Non”… super creative I know tell me all about it.

This is my WiFi view on my iPhone before the show, on this day my camera got knocked out of place. Not very fun haha. That is the only thing I can’t change after it gets raised up. You can see in this photo just how off-center it is. It’s quite dark but that is because it was exposed to the stage lights during the show.

This is my slanted photo, it was a depressing day. I learned.

Here is another slanted photo from a depressing day where it was off-centered.

This is how it is supposed to look! Successful day! No people yet… soon.

Step 3: Experiment
So with each location comes with its own set of problems, pros, cons, solutions, unforeseen dangers, etc. Here is the breakdown, and I had to figure all of these out the fun way- by doing them! In my opinion, one of the best ways to learn. Experiment! Science! Fun!
FOH Remote Cameras
This was honestly the easiest. I basically had to aim it at the stage and get an exposure that was bright enough when the stage was dark and dark enough when the stage was bright. You know, so nothing was overexposed or underexposed to an unrescueable degree for the post. How is unrescueable not a word? I am using it. My blog, my words.
Some problems I ran into here were finding a place to mount the camera at FOH. I couldn’t be in anyone’s way, but I also needed it to be… safe. I didn’t want a concert attendee to pay 40 bucks for a show and walk out $5,000.00 richer… again.
These are some of my FOH images. I have so many from each show as you probably saw in the timelapse I put in that video.

Drummer Remote Cameras
There was a huge LED screen behind the whole stage, so the only rule for me behind the camera photo was that it couldn’t be much higher than Rian (the drummer), otherwise, he would have a silhouetted thing sticking out behind his head. I think it would look awesome from the audience. Rian ft. custom space antenna, but the LD (lighting designer) said nope. It took me a little bit of time to figure out how to attach the camera to the area behind Rian. I eventually just shoved my monopod into the grated walkway behind him and secured it with the good old gaff tape and some zip ties for support.

Spotlight Catwalk Remote Cameras
I only acquired this location once, because it involved me walking up by the rafters of the venue and obviously I would need permission from the venue, you can’t really just mob on up to death dangerous levels as you please. The only problem I ran into on this were hitting my head on low hanging ceiling objects but other than that is was just FOH camera ceiling addition.

Lighting Truss Remote Cameras
A few different problems and most of them revolved around the wonderful world of WiFi. However a lot of different variables had to go right in order for these shots to work — I had to wake up in time, crew had to allow me to put my camera up, there had to be space for my camera, it had to be in a spot where a light wouldn’t overheat it, the pyro wouldn’t hit it, a moving light wouldn’t hit it, it wouldn’t be blocking a moving light, and I had to find a way to make my battery last.
Most of them I figured out on the fly. I solved the camera running out of life by having my camera in sleep mode and using my PW to fire the camera remotely- this way the camera didn’t have to be on, just the PW (which has a much longer battery life) and I could fire the Wizard to wake the camera rather than using another remote. Alternatively, you could have it turned on and use the Canon app to fire it, but those batteries just are not meant to run for 10 hours, you would probably have to get an external battery.
On days my WiFi wouldn’t work (for whatever reason), I would take photos with my camera while standing on stage up at the ceiling. I use my manual focus and try to figure out where the truss would eventually be. So by the time my camera was raised up there with the light (with a lot of luck) focus on the stage at the spot where I took the original image from. Below is an example of the first photo with the far away truss in focus.

One day I couldn’t get the WiFi to work, then eventually it worked and I figured out that my camera was crooked so this guy let me stand on his forklift so I could reach up and change my camera, it was pretty awesome. Crew people are generally great people, as long as you are working with them and not being a dumb ass. The only time I have really had a problem with the crew is when I am on a smaller tour and they are stressed out because they don’t know how to do their job.

On this day I didn’t put my camera up because of pyro. They told me it was going to hit my camera and explode. I decided not to do that. Then I remembered my camera was a rental and I didn’t care if it was damaged- I have insurance (Sorry BorrowLenses). What is the point of having a camera if you don’t use it? So after the lights were all up there was some local crew adjusting them with a cherry picker that went all the WAY up. I am talking… 5 stories? It was high! I took this as a sign. The photo-getting gods were saying “Take the cherry picker, put the camera up, let it explode.” The local crew told me it was possible but I needed my own harness. I told them “If this is your nice way of saying no, then just tell me, because I will go convince someone to give me a harness and then you will feel awkward.” They said it was chill. So nice lighting guy on tour let me use his harness.

Look how happy I was before I realized my camera was knocked out of place come showtime. Lesson learned- tighten those clamps!!
Step 4: Make Your Shot
So WHEN and IF it all works out – here is how it goes with one press of the shutter. Obviously only one of these images is useable, but I wanted you to see the same image from three angles.
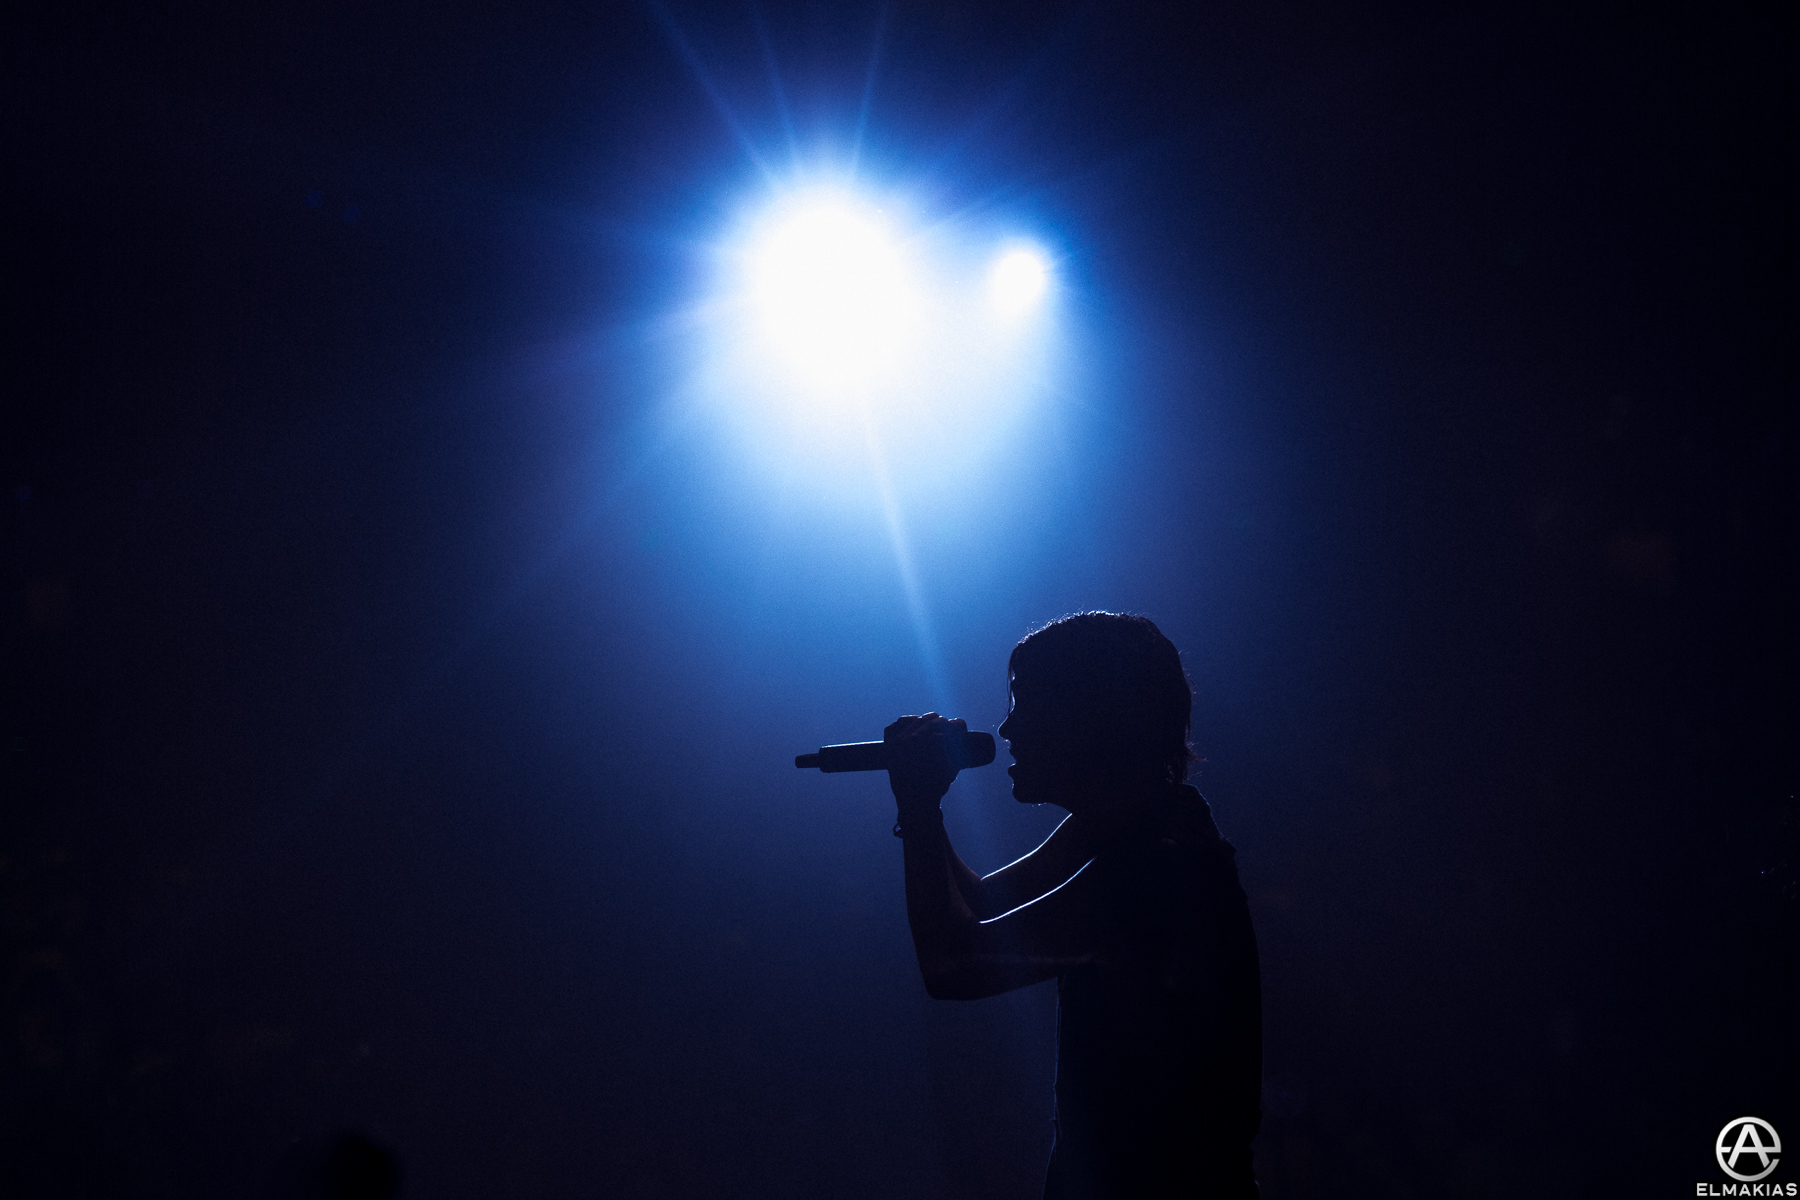
I take a photo from the stage

FOH Remote Camera takes an image

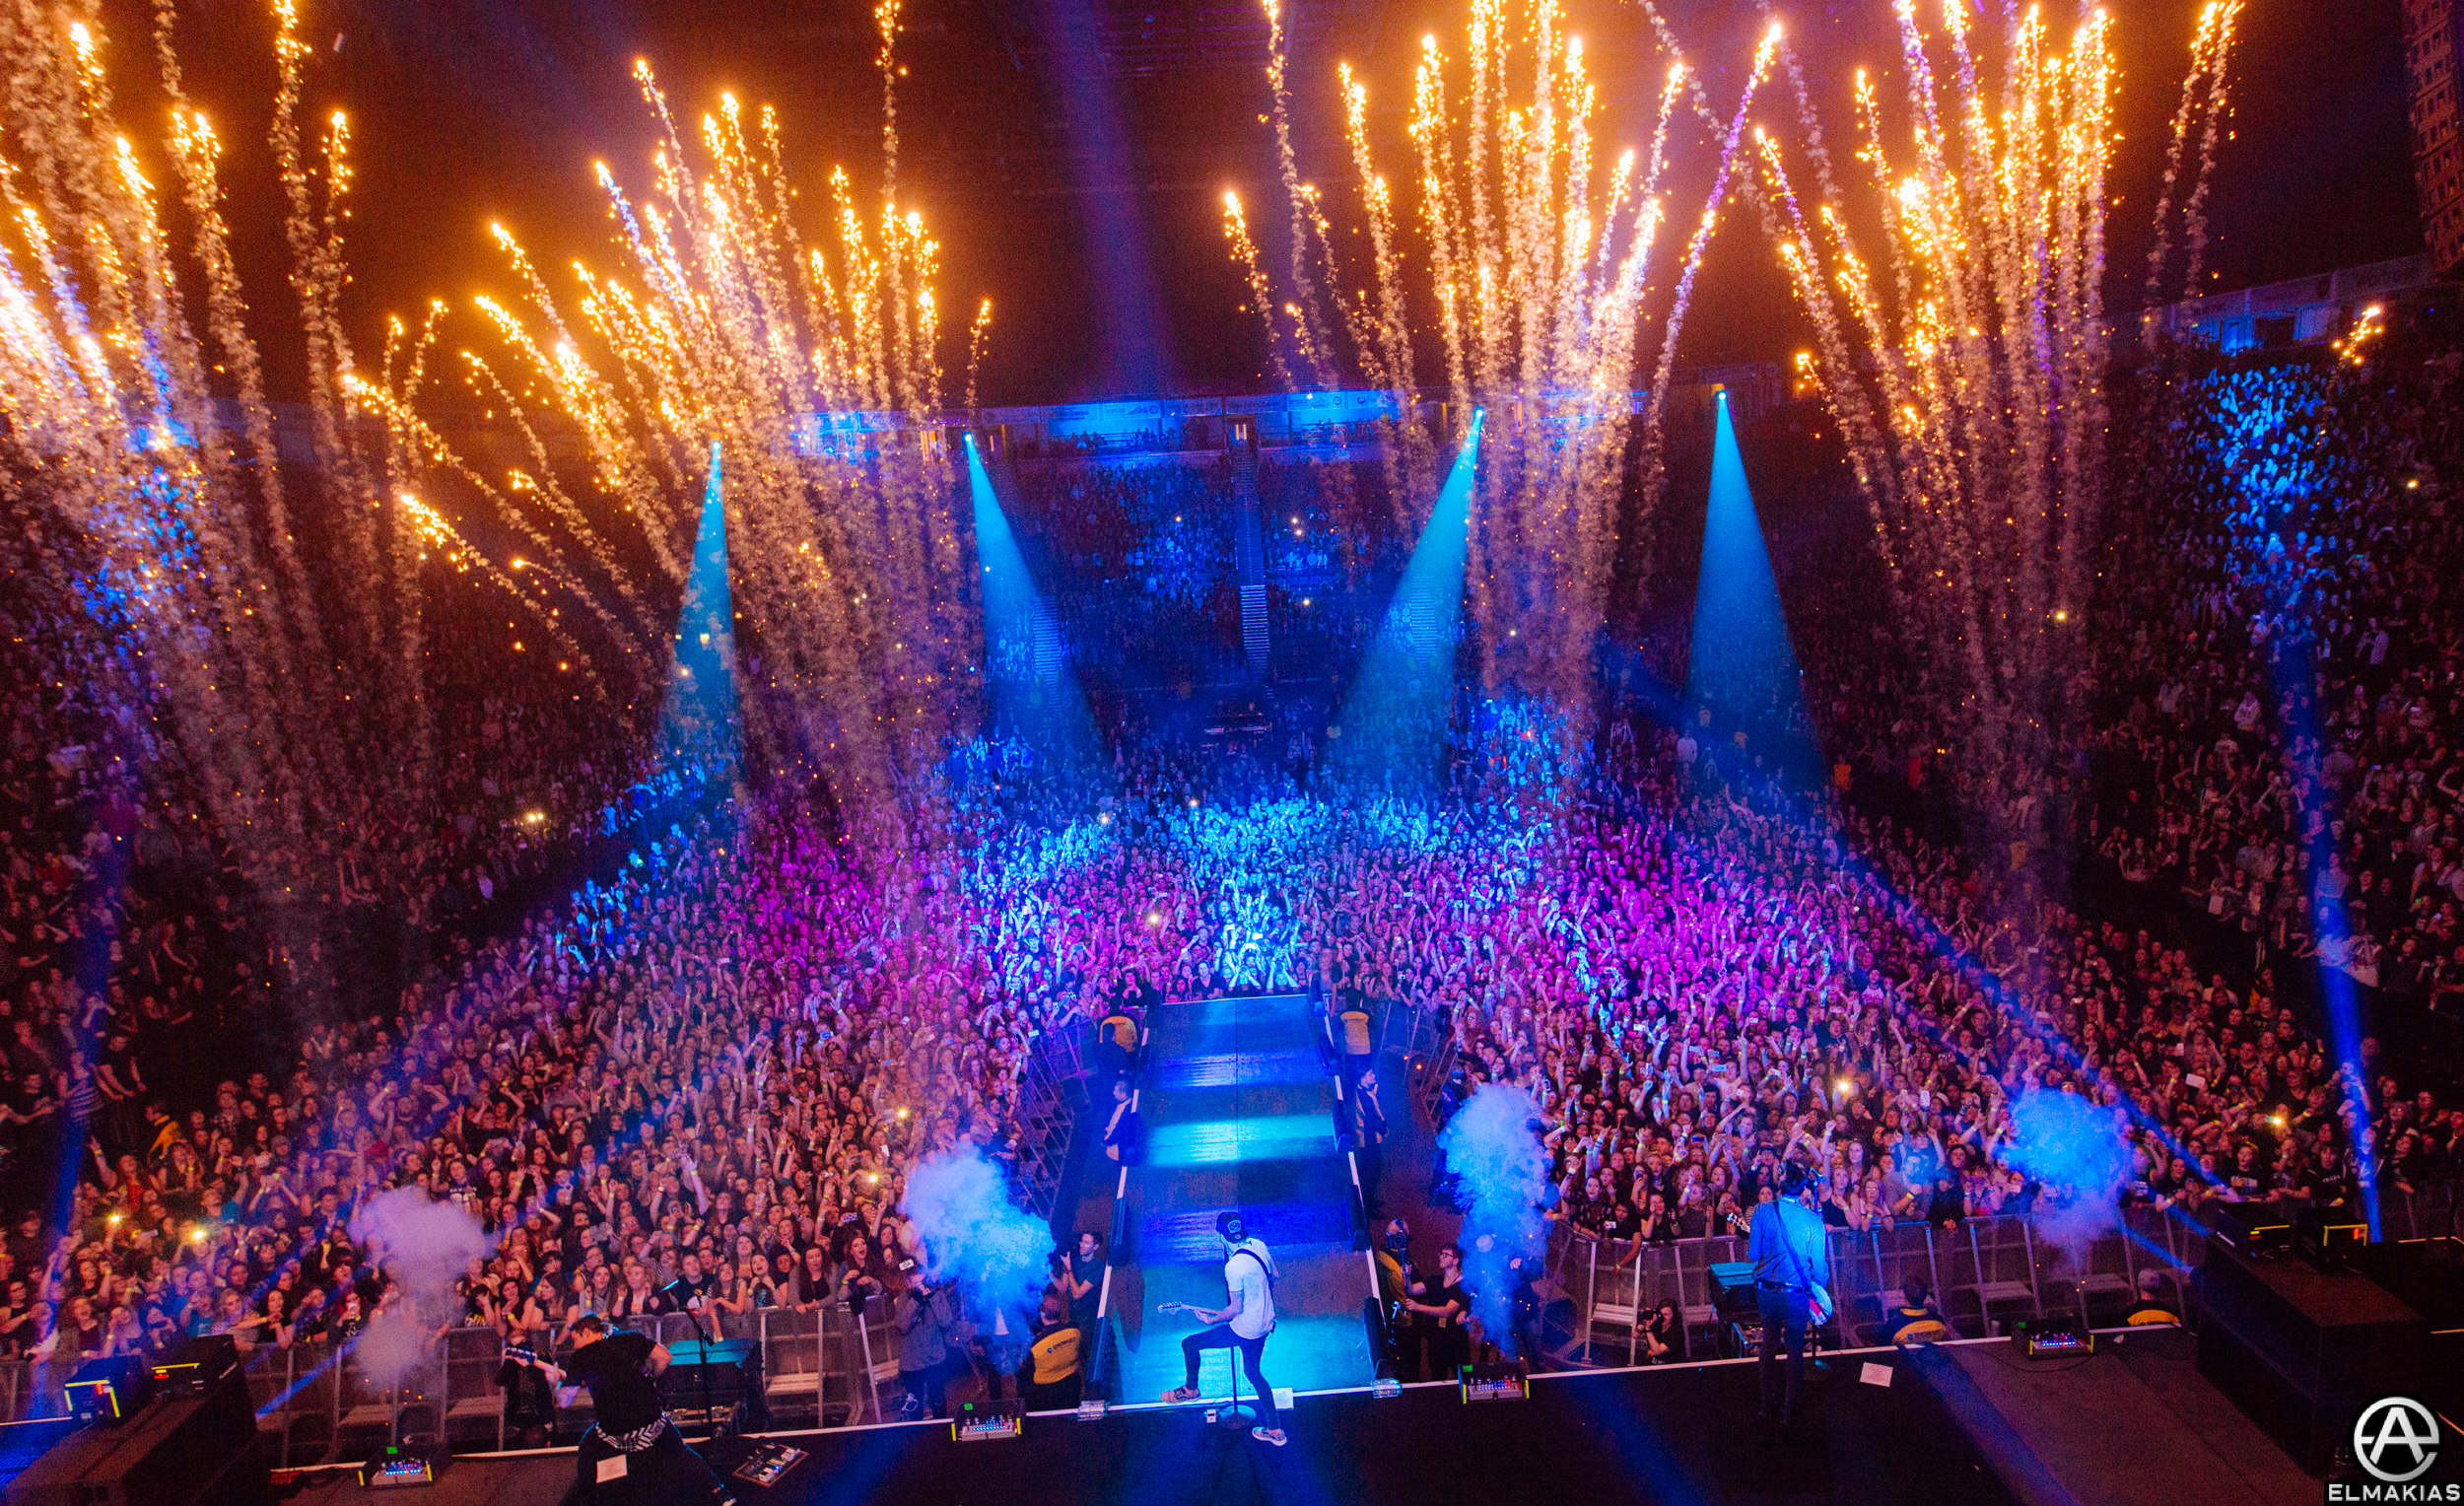
Lighting Truss Remote Camera shoots its image

Here are some of my favorite shots from each location, all of these are shot with a remote camera. I am kind of happy with how everything came out but I can’t wait for December to give it a go again at some other venues. We will see how it goes. Wish me luck. I’ll report back then!
FOH Remote Cameras


Drummer Remote Cameras

Spotlight Catwalk Remote Cameras


Lighting Truss Remote Cameras


Thank you wonderful crew people who helped me out so much. Respect the crew.